
How To Run Windows3.11 In Qemu
Running Windows 3.11 in QEMU
Prerequisites
QEMU 4.2.0 or greater
A 150M Qcow2 disk image:
qemu-img create -f qcow2 win31.img 150M
MS-DOS 6.22
Windows 3.1
I’ve bundled the files, you can download them with:
wget https://github.com/CodeLongAndProsper90/CodeLongAndProsper90.github.io/raw/master/assets/basics.tar.xz
Then extract them using tar
tar xvf basics.tar.xz
Move the three MS-DOS images up a dir, so that they are next to basics.tar.xz and win31.img
Your working directory should look like this:
.
├── basics.tar.xz
├── Disk1.img
├── Disk2.img
├── Disk3.img
├── Microsoft MS-DOS 6.22 Plus Enhanced Tools (3.5)
│   ├── Disk1.img
│   ├── Disk1.jpg
│   ├── Disk2.img
│   ├── Disk2.jpg
│   ├── Disk3.img
│   ├── Disk3.jpg
│   ├── Microsoft MS-DOS 6.22 Plus Enhanced Tools (3.5).txt
│   ├── Suppdisk.img
│   └── winworldpc.com.txt
├── Microsoft Windows 3.11 (Retail Full) (3.5)
│   ├── DISK1-6.JPG
│   ├── DISK1.IMG
│   ├── DISK2.IMG
│   ├── DISK3.IMG
│   ├── DISK4.IMG
│   ├── DISK5.IMG
│   ├── DISK6.IMG
│   └── winworldpc.com.txt
├── Suppdisk.img
Start the MS-DOS install
Start the VM with:
qemu-system-i386 -hda win31.img -fda Disk1.img -boot adc -cpu pentium -m 16 -vga vmware -net nic,model=pcnet -net user -soundhw sb16
You should now see this screen:

Press <enter>

Press <enter>

Press <enter>
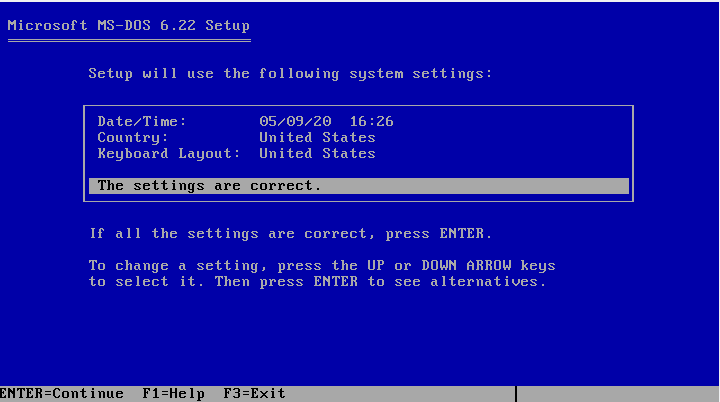
Verify all your settings are correct, and press enter.
Press enter to select the C:\DOS directory:

When you see this screen:

Press Ctrl-Alt-2, and enter
change floppy0 Disk2.img

After that, press Ctrl-Alt-1 to return to setup, and press enter
Do the same for Disk #3
When you see this screen:

Press Ctrl-Alt-2, and enter
eject floppy0

Return to MS-DOS with Ctrl-Alt-1, and press <enter> <enter>.
If you see this screen, congratulations! You installed MS-DOS!

Installing Drivers
Move the MS-DOS imgs back to their directory, and move the Windows disks to the top level:
.
├── basics.tar.xz
├── DISK1.IMG
├── DISK2.IMG
├── DISK3.IMG
├── DISK4.IMG
├── DISK5.IMG
├── DISK6.IMG
├── Microsoft MS-DOS 6.22 Plus Enhanced Tools (3.5)
│   ├── Disk1.img
│   ├── Disk1.jpg
│   ├── Disk2.img
│   ├── Disk2.jpg
│   ├── Disk3.img
│   ├── Disk3.jpg
│   ├── Microsoft MS-DOS 6.22 Plus Enhanced Tools (3.5).txt
│   ├── Suppdisk.img
│   └── winworldpc.com.txt
├── Microsoft Windows 3.11 (Retail Full) (3.5)
│   ├── DISK1-6.JPG
│   └── winworldpc.com.txt
├── Suppdisk.img
└── win31.img

2 directories, 20 files
Download the Sound Blaster 16 driver:
wget https://github.com/CodeLongAndProsper90/CodeLongAndProsper90.github.io/raw/master/assets/sound_driver.tar.xz
Untar it, and move the *img files to the top-level dir.
Load MS-DOS up with QEMU and move to drive a
Run setup.exe.
Select install, and go with the default options until it asks for the windows install directory.
When you get to that screen, press ESC.
Once you do that, it should return you to the main menu.
Press exit and shutdown MS-DOS
Installing Windows 3.11.
The moment you’ve all been waiting for!
Start up MS-DOS, and load the DISK1.IMG file into the floppy drive.

Move to drive A and start setup.
You should see this:

Press enter.
When you see this, select “express setup”

When setup asks you for Disk #2, use Ctrl-Alt-2 to change it to DISK2.IMG

Same deal for disk 3
When it asks for your name and company, you can put anything down.
I entered “***” and “Linux”
You can do what ever’s funny -or serious-

Select “Continue” twice.
When Windows prompts you for Disk # 4, give it DISK4.IMG

When you get to the “Printer Select” screen, select “No printer attached”

When Windows askes you for C:\DOS\EDIT.COM, select MS-DOS-Editor.

Windows will then ask you if you want to see a tutorial. You can select yes or no, it won’t matter either way.

After you complete or skip the tutorial, you are presented with this screen:

Click “Return to MS-DOS”, and shutdown the VM.
That’s it! You now have a working Windows 3.11 install!